I cut the largest circle I could get from the 1/2 yard width of my plaid wool. I made a template first, from scraps of the same bleach-ruined sheet that I used for the mockup of Brian's tailcoat:
 |
| I had to piece the circle template. |
It would later become the lining of the hat. I figured it would give extra body to the lightweight wool, and perhaps add a little extra warmth (the sheet was a light cotton flannel).
I used the pattern piece from the La Mode Bagatelle beret pattern for the hat band, cutting it from just the plaid. Then I started preparing the circles of the hat crown and crown lining (which I kept pinned together after I used the lining as a pattern to cut the plaid outer fabric) for gathering. I did this by first finding the center point (the seam in the lining is slightly off-center) and marking lines with a fabric marker every inch along the edge:
Then once the whole circle was done, I went back and added a line in between, at each half-inch.
I used these lines as guides for my gathering stitches, which I basted in by hand:
I used a new thread for each quarter of the circumference, to make gathering easier. Then I went back around again, inside the first row of gathers:
And a third time:
Then I matched up every quarter point on the circle with every quarter point of the hat band, and began pulling up the gathers.
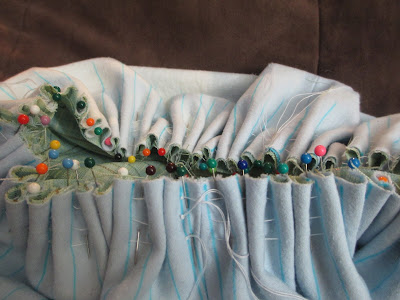
My objective was even, equidistant semi-cartridge pleats:
I was planning on keeping the gathering threads in permanently, so I tied each set together at the quarter points, once the threads were pulled up to their final length:
I left them in because I wanted to give the body of the hat more structure, instead of just letting the gathers open up right from the seam of the hat band.
I hand-stitched each pleat down, bringing my needle up through the center and then pulling it down to one side.
This gave me a bit more control than sewing it on the machine would have done.
Of course, my stitches weren't very even, as I had been working from the inside of the crown:
So I added another row of spaced backstitches, following the grain of the hat band plaid:
This also gave the seam some extra strength. I then folded the hat band up at the previously-pressed crease down the middle, and hand-whipped the folded seam allowance to the lining inside.
I tried it on at this stage (no pictures, sorry) and did not like it at all. Brian the Engineer said it looked like a floppy chef's hat, and I just wasn't happy with the shape. I might have given up on it if I didn't have an event to wear it for the next day. As it was, I dug out some pale green organza-ish material from my stash that I had been toying with using as trim.
I cut a strip from the full width of the piece, folded it in half lengthwise and sewed it into a tube.
I pressed the seam flat, then opened it up and stuck my metal ruler inside so I could press the seam open:
I use this method whenever I have a tube large enough to fit the ruler into. It's quite a handy trick for avoiding unwanted creases on the sides of the tube.
I also had this one-yard piece of light blue cord, which I wrapped around the green sheer tube as I stitched it down into puffs:
I tacked down the ends of the cord beneath the puffs at the back, but left the rest of it free.
I was hoping that this small bit of sky blue would be enough to bring out the blue of the plaid and make the hat coordinate with my Spencer.
 |
| It did not. |
I considered taking off the green puffs and replacing them with blue ones, but I didn't want to re-do all that work. Plus I was afraid that the blue cord would just become lost against the blue sheer material. And I liked the green puffs! They just made the hat a bit too green.
So instead I cut a length of the blue material with pinking shears:
And then cut this strip lengthwise in two:
And trimmed off the selvedge with the pinking shears, as well:
I sewed the two ends together to make one long strip. (I didn't measure it, but it was probably a yard and a half?) I decided to pleat this strip with accordian pleats. I started by pressing it in half all the way down the middle:
Then I folded back one edge into thirds:
And pleated the whole length in this manner, continuing with the other side:
I then wound this strip over and under, behind the green puffs:
I was envisioning neat little fanned half-circles in orderly pleats, but I couldn't quite get them to behave that way. I ended up with somewhat unruly pleated puffs:
But I decided I liked the look of that just fine. I tucked the two short ends of the pleated strip beneath the final puff at the back (I had started weaving them in and out at the center front of the hat band, going both ways from the seam in the blue strip) and tacked them down, but left the rest held loosely in place by the green puffs.
And voila!
I think that extra bit of sky blue adds just enough to make it coordinate with the jacket, and gives the hat itself a little extra drama. I love it!


No comments:
Post a Comment