Of course, my inner pre-teen is thrilled by this development, as I was used to being a size smaller in the bust than I was in the waist and hips. However, as someone who likes to make her own clothes, such a fundamental change is a huge adjustment. But we soldier on.
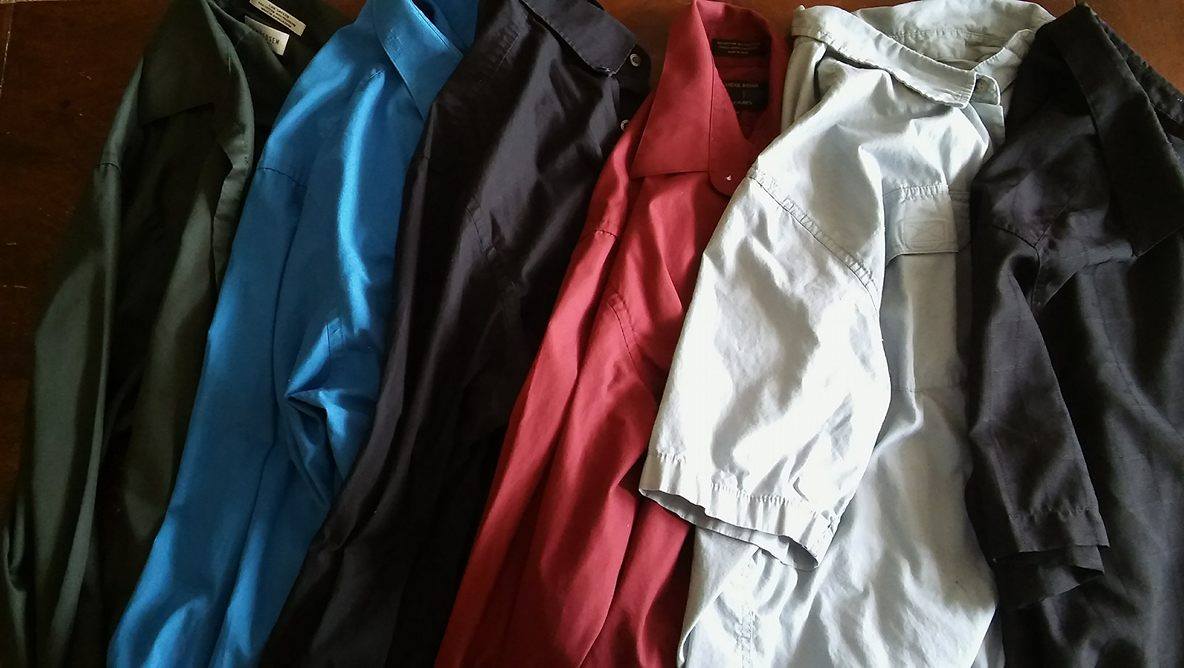
I was commenting on my lack of adequate nursing clothing to Brian the Engineer, and he had a brilliant idea. Why not raid his closet for button-down shirts he no longer wears, and alter them to fit me? So I did! He gave me several to choose from, and I picked these six:
I went through my patterns stash and picked out some button-down shirt patterns that I've never used because I can't be bothered with buying matching buttons, let alone sewing all those buttonholes. They're in a class of patterns that I buy because they're cute, and I always mean to make them, but I never get around to it. I tend to make either really simple and easy modern clothes, or complicated and time-intensive historical costumes for special events.

But the great thing about this project is that the buttons and buttonholes are already done for me! I just have to take each shirt apart and cut out each pattern piece from the existing parts.
For my first victim, I chose this short-sleeved light blue-gray cotton shirt:
 |
| You can see that I'd already started disassembling it before I remembered to take a "before" picture. |
First, cutting. I chose to cut the fronts individually, for greater control. I started with the side with the buttons:
 |
| The pocket presented the first challenge. |

I'll come back to that later.
On the buttonhole side, there was a little piece above the pocket with a velcro tab on one side:

I'm not sure what its function was, but it was now extending into the new seam allowance, so it had to go. I didn't really like the look of it, anyway.

I did my best to press out the stitching marks. They're not too noticeable on the finished garment, unless you're looking for them.
Now the back was another problem. As is traditional with men's shirts, it had a yoke - which of course is not present in my pattern. It also had a pleat at the center back where the yoke was attached:

And the yoke was lined with a wicking fabric, which I did not care for:

I took the back entirely apart, released the pleat and removed the yoke lining. Then I pressed all the seam allowances out and re-attached the yoke:

You can see that the lower back was now wider than the yoke, but that was fine because my pattern piece was narrower than the yoke at the shoulders anyway. And releasing the pleat actually gave me just enough to squeak out the width required at the top of the underarm seam, so I didn't have the same problem as the front pieces.
But before I cut out the new back, I needed to address the yoke seam. Because I wasn't putting the yoke lining back on, I had to finish the seam allowance somehow. I would have liked to have done a flat-felled seam, but the seam allowance was too narrow. Instead, I pulled out my stash of seam tape:

I found a nice light gray that matched the fabric pretty well, and folded it over the raw edges of the seam:

Stitching it down in one step:

Then on the outside, I followed the line of holes left by the original stitching through all of the layers of the yoke and lining:

This gave the appearance of a flat-felled seam, and kept the raw edges enclosed without adding much bulk.
Now I could cut out the new back by treating the re-assembled back pieces as one:

As you can see, the top of the side seam just barely extended past the edge of the fabric, but that didn't worry me because it was within the 5/8" seam allowance.

To solve that issue on the front pieces, I took the scraps from the back:

And pieced them to the missing corners of the front:

 |
| You can see I had also unpicked the lower edge of the pocket, to account for the front dart. |

 |
| Because this bit of piecing is under the arm, it really doesn't show when the shirt is worn. |

And carefully pinned it in place:


Then stitched it back down:


The corners of the pocket flaps encroached on the sleeve seam where I would be stitching down the seam allowance on the inside. So I unpicked a bit:

And pinned the flaps out of the way. Then I trimmed down the body side of the armhole seam allowance:

And clipped the curves of the sleeve side:

Then folded the excess sleeve seam allowance over the trimmed side, and pinned it down to the body:


After that was done, I could re-stitch the pocket flap corners back down.


And of course I flat-felled the side seams, as well.
I got lucky with this pattern, as I could re-attach the original collar without any alteration to it:


Pressed it out, and trimmed away the excess at the side seams, tapering to the original hem around where the back darts hit.

Then I blended the front hem into the back:

This could have been done more neatly, but I was in a hurry because the baby was crying to be fed and I wanted to be done with this shirt. So I did not press the new hem properly before I stitched it. I pressed it afterwards, and I think it turned out ok.


Bonus pic of my little one, who joins me in the sewing room while I work:
 |
| This is the bassinet I slept in as a baby. My parents brought it out from Iowa when they came to visit last month. |
So that was one shirt done! On to the next:
 |
| Since it's summer, I went with another short-sleeve shirt, although this one is polyester. |
I chose a collar-less pattern this time:

The cutting and construction were pretty much the same as the first shirt, except I was able to get the entire back piece from the original lower back piece, without using the yoke at all. This gave me extra fabric to play with, as the yoke was lined with the same fabric as the rest of the shirt.

I pressed both yoke pieces, pinned them together carefully matching the stripes, and stitched them together to create a piece large enough to cut the bias strips for the neckline binding:

The pattern also called for bias binding on the armholes, but I finished all my seams with flat-felling once again. I really like the look and feel of flat-felled seams.
And that's two shirts done! I somehow managed to lose the pocket on the second shirt. The pattern cutting placement had necessitated removing it entirely, and I had planned to re-attach it before assembling the shirt again, but it had disappeared. Oh well. If it turns up again I can always put it back on.


I really like how this one turned out. It feels very feminine with the rounded neckline, and the fit is comfortable. I also like the pleats at the top of the sleeve. I'll definitely use this pattern again.

I have four shirts left to play with, and I'm having fun with this project. The only thing that keeps tripping me up when wearing the shirts is that the buttons are on the opposite side, so I have to actually think about how to button them up each time. :p