Lately I've been using this little basket, which works fine:
 |
| Winterthur Museum |
 |
| Victoria & Albert Museum |
 |
| Museum of Fine Arts - Boston |
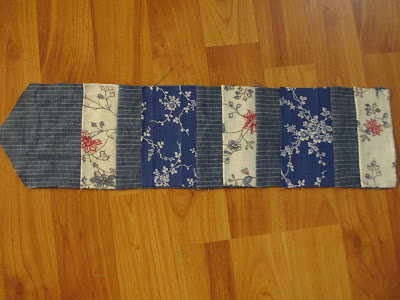
First I pieced the outer layer, using scraps from the first two gowns I made for Colonial Williamsburg last year, when I was working at the Costume Design Center. I kept the extra length that I cut off the hems of both gowns, because I'm sentimental. I felt this project was a good use of these long strips that were straight-of-grain along one edge and angled on the other:
I sewed them all by hand, partially because I wanted a really authentic housewife, and partially because my husband and I were binge-watching Netflix and I didn't want to leave the room to go use my machine.
When I had a 4 1/2" wide strip long enough, I cut off the top corners and trimmed up the slightly irregular edges using the pattern I had made. I wanted five pockets, so I added length to the suggested pattern from the tutorial.
I cut another layer from a scrap of medium-weight wool for the interlining:
I cut and hand-hemmed pockets from more scraps of the two gowns, and used scraps of a striped linen for the inner lining. Here I have my pockets laid out in the approximate position I wanted them in:
I wanted to avoid raw edges altogether, so I started layering the pockets and lining onto the interlining like so:
 |
| Starting at the top (pointed) end, I laid out a layer of lining, my hemmed pocket, and another layer of lining, matching raw edge of pocket. |
 |
| Then I folded the second layer of lining down and pressed it below the pocket, encasing all raw edges. |
Another pocket was then layered over this lining piece, and the process was repeated down the line until all pockets were attached:
 |
| (I trimmed away excess from the bottom layers of lining before folding down the new one, to cut down on bulk.) |
Then it was a simple matter of sandwiching the outer fabric with the interlining/inner lining and pockets, and binding the raw edges:
 |
| I used another striped blue linen for the binding. |
And stuffed the pockets with sewing tools!
 |
| The scissors will soon be replaced with an authentic 18th Century embroidery scissors replica. I also want to add a hand-marked measuring tape. |
A few more pics of the finished product:
Now I can sew in historically-accurate style and comfort! :)


Oh this is just FABULOUS!! I LOVE the patchwork, all of the different prints, and everything about it!! I want one!!
ReplyDeleteKeep inspiring us, Anneliese :)
Thanks! I want to make more now. :)
DeleteBeautiful, thanks for sharing
ReplyDelete