Wednesday, October 30, 2013

100th Post Retrospective - Chelsea Learns to Sew

By a completely random happenstance, I noticed yesterday that I had 99 posts on this blog.  So to celebrate my 100th post I decided to do a bit of a throw-back, even though it's not Thursday.  One of the most common questions I got asked at the Costume Design Center open house last Friday (more on that later) was "How did you learn how to sew?"  And I began to realize that this would be a good question to answer on my blog.  So here's the story, complete with visual aids!  I present to you The First Quilt I Never Made:

Kinda reminds me of the Fourth Doctor's scarf.  
So how did I learn how to sew?  Well the short answer is:  My mom taught me.  The longer answer involves the fact that at first, I kinda hated it.  A lot.  So how did I get from 12-year-old Chelsea hating sewing to 28-year-old Chelsea literally working a full-time job that is nothing but sewing 40 hours a week, then coming home and doing more sewing?

Let's start with the quilt.  I was rather amazed when I came across this remnant of my first ever sewing project, since quite obviously I never finished it.  (I should point out that this was my first machine sewing project - it's possible that the embroidered pillowcase project predated this one.)  Mom decided that it was high time I learned how to use the sewing machine, and gave me a pile of scrap fabric and an index card.  She told me to use the card as a template and cut rectangles from the scraps, and sew them together into strips.  Ideally these strips would have eventually been sewn together into a quilt top, but this was as far as I got before abandoning the project.

It's interesting to examine my younger self's workmanship.  I clearly knew nothing about cutting on the straight of grain (although I did know to only cut from the edges of the fabric - not the middle!) or about ironing fabric before cutting...  (Silly me, I thought you only ironed clothes.)


I also didn't know about backstitching at the ends of seams.


This is where my sewing saga may have ended, if Mom hadn't given me a dress she made for my Samantha doll for my next birthday.  Suddenly it dawned on me - I could make clothes for Samantha myself!  (I was very, very big into American Girl dolls at the time, so this was a big deal.)

Samantha serving tea to my sisters' dolls Kirsten and Felicity - I made none of these dresses.  
So now I had a genuine interest in learning how to sew, and I really haven't looked back since.  I honed my skills on American Girl doll clothes - learning how to construct bodices and set gathered sleeves, how to make do with not-quite-enough fabric, how to sew with knits, velvets, chiffon, etc.  With my mom's guidance, I learned how to read patterns and then how to ignore the directions entirely and create my own vision instead.  (I should really dig up some pictures of those...)

By the time I was in high school I had progressed to making clothes for myself, and even managed (with Mom's help) to make both of my Prom dresses - of my own design.  This naturally led to gaining a workstudy position in the costume shop for my college's theatre department.  I learned a lot of valuable skills from my supervisor there, Jean.  She taught me about muslin mock-ups, flatlining, pressing seams as you go, ironing your fabric - and your pattern pieces - before cutting, how to drape, how to dye fabric, and that no matter what mistakes I make, there's always a way to fix it.

Some of my work from "All's Well That Ends Well" - I made the white gown and the gold overdress on the black gown
Another "All's Well" costume I worked on - I remember the sleeves being a particular challenge.  
I was responsible for detail work on these two gowns from "The Learned Ladies"  
After college I continued sewing for myself and for dolls, even dabbled in making doll shoes.  I went through a few jobs unrelated to sewing, eventually finding work in bridal.  Alterations taught me a lot about quality construction and embellishments such as beading and embroidery.  I also forayed into designing items for someone other than me - mostly adding cap sleeves and lace keyhole backs to strapless bridal gowns.


And now I work at Colonial Williamsburg, where I'm still learning new things every day.  I hope I never stop.  :)

Monday, October 28, 2013

Spencer Pictures and Austenland

Yesterday a group of us from the Regency Society of Virginia met up in Norfolk for a showing of Austenland, which for me was really a reason to get dressed up and show off my new velvet spencer.  The movie was fun, and I did get a kick out of wearing my 19th Century garb to a 21st Century movie theatre.

Look at us being all anachronistic!  

Wednesday, October 23, 2013

Learning to Spin

Back in July my cousin's fiancée Erin and her mom and sister came to Williamsburg for a visit, during which Erin and I attended the Drop Spindle class that is taught in the Historic Area two evenings a week.   

The class cost $25, and included a kit with a wooden spindle, large hank of high-quality wool, cotton leader cord and instructions.  In theory the instructions would be enough to teach one how to spin, but I for one am a visual learner and it was immensely helpful having an experienced spinner show us what we were doing.  

Our intrepid teacher
Erin learning to spin:  


Look at how much fun it is!


Then two weeks ago while my parents were visiting me, my mom and I took the same class.  I brought along my spindle with the yarn I had already spun, and I finished spinning all the wool that came in my kit during the one-hour class.  I actually didn't have much left to do, as I'd worked on it off and on since the first class.  This left me plenty of time to take pictures of Mom learning to spin!


Joining the wool fibers to the leader cord
Drawing out the wool
Spinning!  
Here I am nearly at the end of my un-spun wool.  
Unwinding the finished yarn from the spindle
My completed skein of one-ply yarn!  
Now I just need to spin it together counter-clockwise to make two-ply yarn, wash it, dye it, and make something out of it!  I just have no idea what yet...  

Saturday, October 19, 2013

Gold Velvet Spencer

Well, I finished my jacket in time for the RSV picnic - which was cancelled.  :(  Which I didn't find out until I had already driven all the way there.  Grrrrrr.  Oh well, at least I didn't get all decked out first.

But!  Bright side!  The spencer is done, at least done enough that I could have worn it today.  It still needs fasteners, but I had planned to pin it in place for the picnic and it probably would have been fine.  I'm actually extremely happy with how it turned out, and I think it ended up being cuter than my original design!


Wednesday, October 16, 2013

Modern Jacket Turned Spencer

...Well, almost.  I'm not quite done with it, but it will be at least wearable by the re-scheduled RSV Picnic on Saturday.

Before:  Modern velvet blazer with embroidered back detail.  Also a little too big for me.


In progress:  I pinned the jacket and lining layers together along my underbust line, and hand-basted them in place.


Then I cut the bottom off below my basting line.


Next I took in the sleeves along both seams, and the underarm seams in the jacket body.  Here's where I am now:


Looking at the pictures now, I'm thinking I'll need to take in the armscye, at least in the back.  I might add short puffs to the top of the sleeves while I'm at it, using some of the fabric I cut off.  I'm also thinking about adding a small ruffle to the sleeves at the cuffs.  Originally I envisioned a cute little peplum at the back, but now I'm thinking that might be too fussy.  I'm also increasingly realizing/remembering that I do not enjoy sewing with velvet.

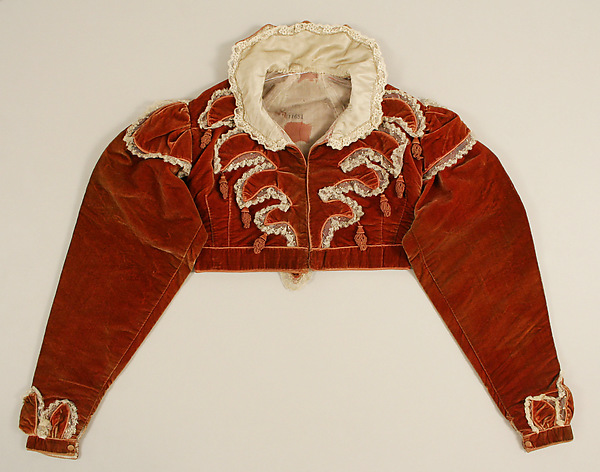
I am inspired by these images of extant velvet spencers, one of which even has embroidery!

V&A
Met
???


Monday, October 14, 2013

Striped Bonnet Making-Of

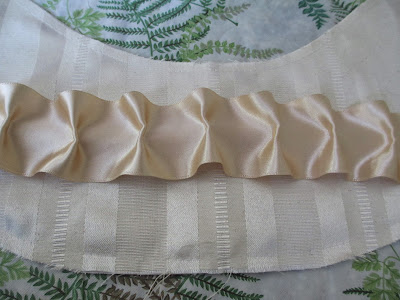
When I last posted about my striped bonnet in the works, I had it all cut out and the fashion fabric pieces were stay-stitched to the buckram interfacing.  My next task was to sew the crown together and line the brim.  I then needed to bind the edge of the brim in a decorative manner before attaching it to the crown and adding the crown lining.  I had a three small lengths of cream satin ribbon to work with, and I set one piece aside to go around the base of the crown, and another for future trim.  This left me with a piece that was long enough to go around the front of the brim, with some extra.  I wanted a smooth fit with some visual interest, so I marked off 1/4" tucks every two inches and stitched them by hand just in the middle of the ribbon:  


This left the edges free so I could take in more length on the inside curve of the ribbon, to make it lay smoothly:


I used my nifty little mini-iron to press the pleats flat:


Then I sewed all those tiny pleats down by hand.  It was a long and tedious process, and several times throughout I questioned whether I would like the finished effect, but overall I'm happy with it.  Next I attached the brim and tried it on my trusty styrofoam head.


 But I could not get the buckram in the crown to hold its shape properly!


Brian the Engineer suggested I line it with cardboard.  So I raided the recycling bin.


I used the pattern piece I had traced when I made my buckram mockup, and cut 5/8" in from the edges all around to account for the seam allowance.


Once I got the insert in the crown I had to shave down some of the edges to get it to fit properly.


Next, the lining got pinned in place and sewn in by hand:


I played around a bit with the remaining ribbon, and decided on a simple bow in the back:  


Brian suggested I fold the ribbon in half to go around the base of the crown, and this turned out to look much better.


All finished!  You can see pictures of my mom wearing it in my previous two posts.    

Saturday, October 12, 2013

A Leisurely Afternoon Stroll

After Saturday's tea, Stacy, my mom and I joined my dad and Brian the Engineer at Fort Monroe for sight-seeing and a fun photo shoot.  Brian took all of these photos (except one, which will be obvious) and directed us where to stand and how to pose.  He has a very good eye for pretty backdrops and naturally-occurring props, and knows when to take candid shots - which usually turn out to be my favorites.  

Stacy, Me, Mom
Caution:  This is a picture-intensive post!

Friday, October 11, 2013

RSV Ladies' Tea

As my faithful readers (Do I have any of those?) will know, my parents came out to visit me from Iowa this past weekend.  On Saturday my mom and I joined a few members of the Regency Society of Virginia for a Ladies' Tea that I helped organize.  I had a great deal of fun dressing my mom up in Regency finery, and we traveled to the Victorian Tea Station for afternoon tea.  The food was delicious and the company was superb.  

Rebecca, Stacy, Mom (Willie) and me