Showing posts with label Year of Foundations. Show all posts

Sunday, January 24, 2016

HSM - A Good Start and an Apology

First of all - and this is long overdue - I would like to apologize to all those who signed up to participate in my 2014 Year of Foundations sew-along that I promptly abandoned very early in the year.  I wish I could use the excuse that "Hey, I got engaged and the wedding took over everything!"  But that is just not true.  I got engaged at the end of May in 2014, at which point I had already been neglecting my sew-along for a solid three months.  So again, I apologize to everyone who was planning to participate and/or watch.  I know I had very ambitious plans for making undergarments that went right out the window, and I feel bad about that.  But I feel worse about the fact that all of my promised inspiration posts, tutorials, and participant round-up posts were likewise never realized. I truly am sorry that I disappeared so thoroughly on that front.

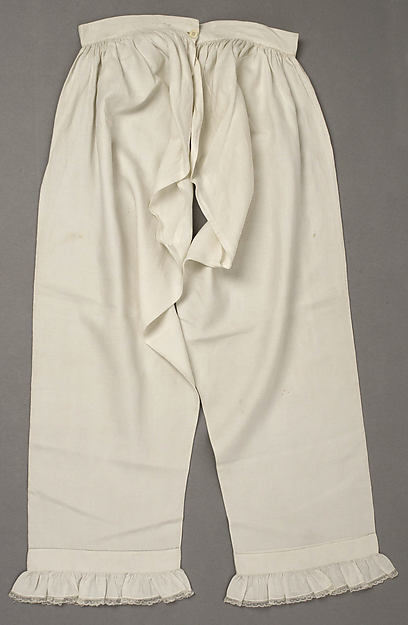
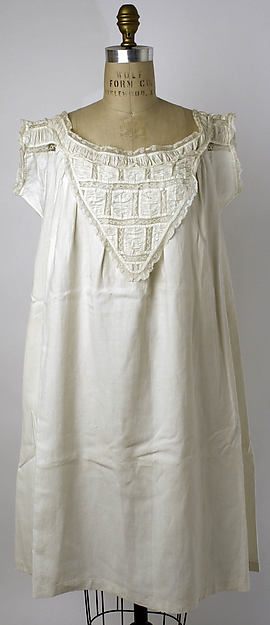
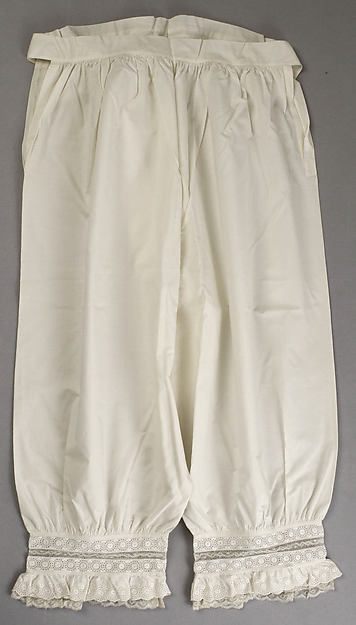
Clearly I am not cut out for running sew-alongs.  I can, however, participate in them.  Which brings me to my first Historical Sew Monthly post of 2016 - the aptly-named Procrastination Challenge!  (This ties into my apology, because my focus for this challenge is 18th Century foundation garments.) 

So far, so good.
I was originally planning on finally finishing my 18th Century stays for this challenge, and I may still.  I have started working on them for the first time in two years, so they definitely fit the Procrastination theme.  This is how I've been storing them since March of 2014:

Zippered plastic bags - especially those with hooks - feature prominently in my sewing room organization system.
I started by evaluating the work to be done.  I had left off with the layers of coutil and blue cotton broadcloth basted together:

Another zippered plastic bag in a conveniently circular shape holds my collection of reed boning.
The next step is clearly to start stitching channels for the boning.  I chose to do this - starting with one of the center front pieces - in a somewhat unorthodox way.


I inserted a piece of 1/4" reed boning between the layers of coutil and nudged it up against the CF basting stitches, then began stitching right alongside the other edge: 

I'm using a spaced backstitch, which is one of my favorite stitches to use.  I decided to go with off-white thread for contrast - totally period.
I keep moving the reed as I go, creating new channels across the width of the piece.  This is how far I've gotten:


This will be slow going, I know.  But I think I'll be happier with the finished product than if I were to sew all of those boning channels by machine.  And with the bone inserted as I'm sewing, I know that the channels will be the same width and the bones will fit snugly.

Hand sewing hurts my left hand after a while, so I can't work on these continuously.  I have been very active in the meantime, though!

Ignore the mock-stays.  They will only ever be worn by my dress form, Anna.
I finally made a set of pocket hoops!  I had very well-intentioned thoughts of joining The Dreamstress's Panier-Along way back in 2013, but... Well, I didn't.  But I finally got around to it, and I made these in two days!  I took exactly zero pictures of the process, mostly because The Dreamstress did such a fantastic job of writing and illustrating the tutorial with her own pictures, that I thought mine would be completely redundant.  Anyway, they are done and they are fabulous!  Here's the breakdown: 

The Challenge:  Procrastination

Material:  Linen?  Burn test was inconclusive.  Also, 1/2" reed boning from corsetmaking.com

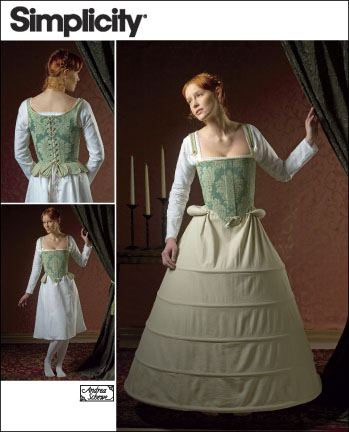
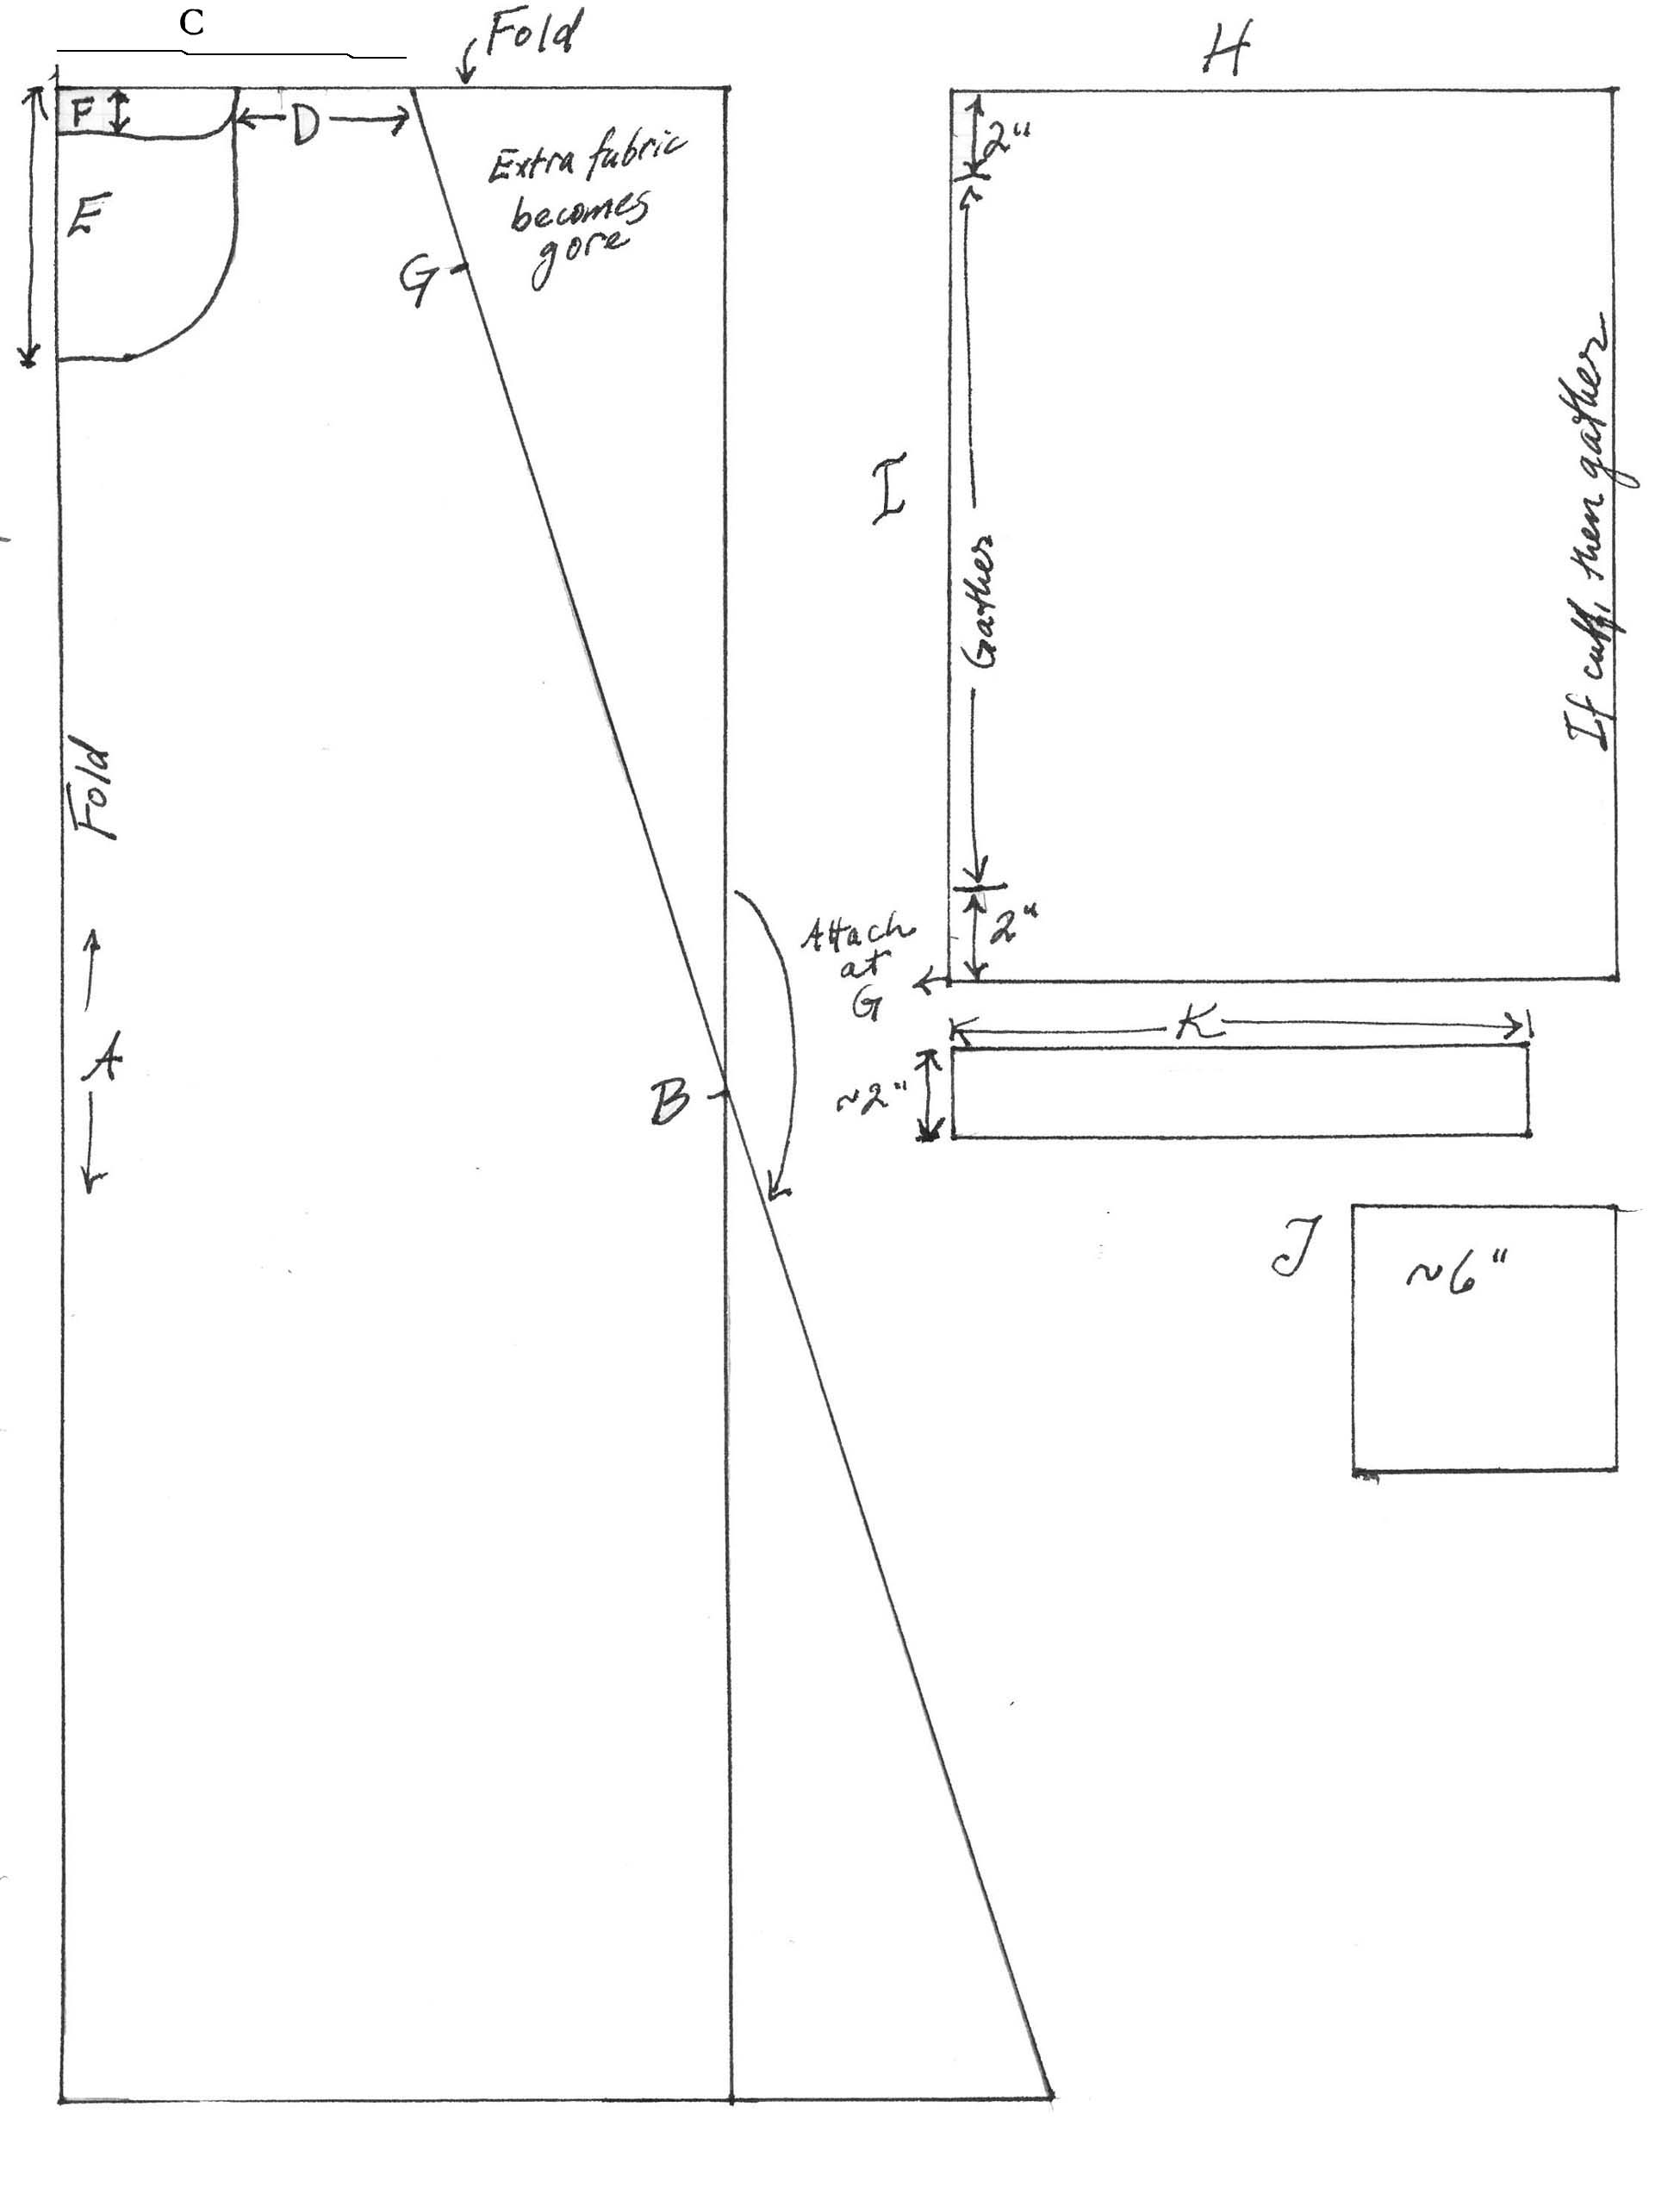
Pattern:  Panier-Along tutorial by The Dreamstress

Year: 1760s-1780s

Notions:  Cotton twill tape, thread

How historically accurate is it?  Pattern-wise, very.  Materials-wise, mostly.  I'm calling the fabric I used linen even though it suspiciously doesn't wrinkle.  Construction-wise, I cheated and sewed it entirely by machine.  So kinda?  Overall I'd say 80%. 

Hours to complete: Not including the overnight soaking of the reed boning, I would say three or four?  It went super fast. 

First worn:  Just for fun so far.  I have an event in March where they will be first worn. 

Total cost:  I believe I paid $1/yard for the fabric from the bargain table at the Costume Design Center, and I certainly used less than a yard.  The reed boning is $25/coil, which is approximately 90 feet.  I used 12 feet, so approximately $3.33 worth.  Thread and twill tape were in my stash, so total cost is around $4.00 

~ ~ ~ ~ ~

Wednesday, March 5, 2014

The Demise of Quick and Dirty

Do you have an inner sewing nag?  You know, a little voice that grows stronger as your sewing skills evolve and expand, that never lets you regress to your previous level of knowledge?  It's terribly annoying.  I call mine Nellie the Nag.*

She won't let me sew anything "quick and dirty" anymore.  When I try to get away with it, she reminds me that I know the correct way to do things, and that I know it's better.

Typical conversations between me and Nellie the Nag:

Nellie:  "What are you doing?  Match up your pattern pieces to the grain lines!"
Me:  "But I just finished laying it out!  I don't wanna do it over."
Nellie:  "Do it anyway!"

Nellie:  "Press your seam allowances open!"
Me:  "But it's just a mock-up."
Nellie:  "Do it anyway!"

Nellie:  "Clip those curves!"
Me:  "Ugh.  I hate clipping curves!"
Nellie:  "Do it anyway!"

See a pattern here?  So bossy!

*I can't help it.  I, like Stan Lee and JK Rowling, love alliterative names.  :p

~~~ In somewhat related news ~~~

I know I've been rather delinquent on Year of Foundations posts, but that doesn't mean I haven't gotten anything done!  I have my stays all cut out and the layers are basted together:


And I made a rump!

Glamorous, no?
It's a very simple tube made from a scrap of quilting cotton that had the benefit of already being roughly the shape I wanted.  I pieced one end to make it longer, tapered the other end to match, and sandwiched twill tape ties into the seam at either end.  It's stuffed with a hunk of quilt batting which I rolled up and stuck inside with some difficulty.  I added more to the middle, as I want the bulk of the... well, bulk... to be at the back.

Here's how it looks in action, shown here on the dress form over my mock-stays:


So I officially have one foundation garment finished!  Whoo-hoo!  Other "Foundationers" as one of our participants christened us, have been much more productive these last couple months.  I'll do a round-up post soon, but in the meantime you can see what people have been doing on Facebook.

The main reason I've been lax at posting recently is that I've been consumed with a new project which I will also be posting about soon!  Here's a teaser:


And, just for fun, here's a pic of Jazz "helping" me with my project:


I guess the pins are a good back scratch?

Monday, January 20, 2014

YOF - Starting (Over) With Stays

My first major project of the Year of Foundations will be stays.  My first attempt did not go well, as I didn't really know at the time what I was doing.  I was using a lightweight cotton broadcloth for the outer layer, and unbleached muslin for the inner layer.  I have since learned that I need much denser weave for both layers, with a separate lining and optional fashion fabric on the outside.  My other mistake was in using 1/2" reed boning, which is much too wide and thick.  I also put the boning in all the pieces before sewing them together, which is probably not the easiest way to do things.


When they were all sewn together - but before I'd put any eyelets or the bones at center back in - I tried them on with the help of my friend Sarah, who was also my roommate at the time.  She used large safety pins to hold the back edges together, and marked some alterations for me with a Sharpie.  At this point I resigned myself to taking out some of the seams, adjusting bones, and sewing them back together.  I also noticed while wearing them just briefly that the sharp edges of the reed were starting to wear through my flimsy fabric.

I had put a lot of time into these, and was getting rather frustrated.  I came to the realization that it would be best to scrap this attempt and start from scratch, which was really discouraging.  All of this happened back in June or July, and I hadn't touched them since.  Then one day about a month ago I was browsing through The Aristocrat's livejournal, drooling over all her gorgeous stays, when I found this tidbit:  "First I make a boned mock-up to be sure it really fits."

Lightbulb!  Suddenly I didn't have a worthless garment anymore; I had a boned mock-up!  I hadn't wasted all those hours hand-sewing around the tabs after all!  So I finished it enough so that I could try it on for real, albeit very hurriedly.  I punched eyelet holes with my awl, but didn't bother binding them with thread.  I'd sunk too much time into this project already.  I also used The Mantua Maker at Midnight's excellent advice, and steamed the upper edge at the back to shape it in towards my body.  The reed bends easily when wet, and holds its shape beautifully.  Now I could finally test the true fit!

I actually got into these by myself, which is why the bottom three eyelets are laced backwards. :p
You can see the Sharpie lines Sarah drew on this side.  
I think the shoulder straps are set a bit too wide at the front.  
But overall I'm happy with the shape.  :)  
I wore them around the house for about three hours, and they were surprisingly comfortable!  The only thing that bothered me was the front of the armscye, which cuts in too far for comfort.  I made some additional marks to correct this in the final pattern.

I also tried on my Green Swallowtail Jacket over the mock-stays to see how it fit with them on.  Happily, it seems to fit pretty well!  I don't think I need to make any major alterations to it, anyway.


It looks much more polished now!  I still need to add eyelets to the front, as I've been pinning it closed in front when I wear it.  It is period-accurate to do so, but it's also a pain.  :p

After wearing the mock-stays for three hours, I had Brian the Engineer tighten the laces until the center back edges met.


I probably won't wear them this way very often, but it is nice to know I can.  I could still breathe fine, and the Striped Silk Gown I bought last summer fits very well over the fully-tightened mock-stays.  I wore them fully tightened for about an hour, and once again they were comfortable apart from the armholes being too small in the front.

I made a new pattern based on the adjustments marked on the mock-up.


I've moved the shoulder strap over and cut down the armscye for comfort.  
I've washed and dried my coutil and fashion fabric (I've chosen a heavier, slightly darker blue cotton) and now I'm ready to cut out my new stays!  That'll be tomorrow's project.  Wish me luck!

Saturday, January 18, 2014

Final Thoughts on 2013 - No New Fabric and Historical Sew Fortnightly Challenges

I've learned a lot in the past year about costuming, blogging, and deadlines.  I successfully abstained from purchasing fabric for a full twelve months! ...And I less-than-successfully followed the Historical Sew Fortnightly year-long challenge.


Looking ahead, I have a clearer idea of what types of costuming goals I should set for myself and how to go about achieving them.

I decided not to join the 2014 HSF, mainly because I think this type of sew-along is not really for me.  I loved it for the first half of the year, but then the challenges stopped fitting so nicely with my own schedule (haphazard as it may have been) of planned costumes and events.  And then I moved.  Twice.  Not surprisingly, it all went downhill from there.  Out of the total 26 challenges, I completed only 9.  So rather than once again set myself up for failure, I'm going to concentrate instead on the Accessorizing Head to Toe and the 18th c. Court Ensembles challenges that I had already signed up for, as well as running my own Year of Foundations sew-along.


This is not to say that the Historical Sew Fortnightly was a total disaster for me!

What I loved about it:
  • The creative ways in which each challenge theme could be interpreted
  • Seeing everyone's finished projects and getting inspired
  • The collaborative community of costumers from around the world
What I would do differently next time:
  • Get organized and plan out my year of costuming in advance
  • Break up large projects into smaller pieces that can be achieved in two weeks
  • Research my planned garments more thoroughly

As for the self-imposed No New Fabric challenge, I would call it a rousing success!  It worked well for me mainly because I already had such a large stash of fabric to begin with.  :p  I kept it up by avoiding fabric stores and by putting off any projects that called for fabric I did not own until this year.  Which brings me to this year's goals!

Year of Foundations


This will be my primary focus in the coming year.  I've already posted about my specific plans concerning the YOF, so I won't go into detail here.  Briefly, I am planning two full sets of historical undergarments - 18th Century and Victorian.  This means I need to buy a substantial amount of linen for shifts and chemises, and I've already purchased coutil for stays and corsets.  For petticoats and skirt supports, I will be using old sheets from my current stash.

Menswear


This is the main category of costuming that I have been putting off until I could buy fabric again.  I want to start making Regency men's clothing so that Brian the Engineer can come with me to future RSV events.  I currently have nothing in my stash that is appropriate for this endeavor, especially now that I've been working at Colonial Williamsburg for nine months and have learned to appreciate natural fibers even more than I already did.  This means more linen for shirts, and some nice wools and heavier linens in dark, muted colors for trousers or frock coats.  Fortunately, I have several fabrics in my stash suitable for waistcoats.

18th Century gowns


I already have the fabric for several gowns which I had planned to make last year but never started because I never finished my stays!  This will be rectified shortly, thanks to the YOF.

Regency gowns


According to the RSV schedule of events, I have a Valentine's social, a tea, a luncheon, a picnic, an ice cream tasting, a nature walk, and at least one ball to plan for in the coming year!  I clearly need to add to my meager wardrobe of two day dresses, one sheer ballgown, two bonnets, one spencer, and two reticules.  I have plans (and fabric) for at least two bodiced petticoats, and I want to make two more sheer gowns to wear over them.  I have already done some pre-shopping on fabric for those sheer gowns, and they're going to gorgeous!  :D


Now of course I don't want to start buying fabric like crazy just because I can, so I came up with a couple of new rules for myself:

When new fabric is purchased, it must be used within a month, or I have to donate it to the bargain fabric table at work.  

This should prevent me from returning to my old habit of buying fabric because "it's such a good deal!" or "it's so pretty!" or "I might need it someday!"  

For the purposes of this rule, "used" will mean something has been cut out from said fabric.  This will keep me from waffling about what I want to make from a particular fabric, and will also get me to be more productive rather than just accumulating yardage.  Cutting out is my least favorite part of sewing, so once that's over with I am much more likely to finish a project.  It's not fool-proof though, so my second rule is:

When I start a new project, I have another month to finish it.  

So this means that the beautiful blue velveteen I bought last week at that very bargain table must be cut for a Regency bodice by no later than February 8, and sewn together by March 8.  

However, I can still buy large amounts of fabric that is useful for multiple projects, like muslin or coutil, and I don't have to use it ALL in a month.  I have to cut out at least one thing, but the rest can be stored until it's needed.  And if a project is one that takes more than a month, it's ok as long as I'm working on it continuously.  I'm just not allowed to cut something out and then abandon it, as I've done so many times in the past.

So, onward!  I have fabric to buy!  :D  

Tuesday, January 14, 2014

Year of Foundations Pinterest Boards

I've started a new Pinterest account just for the Year of Foundations, with group boards so everyone can pin their favorite inspiration sources, tips, tutorials, pattern reviews, etc.  I have a board for each category of foundation garments, including the new optional category of Modesty Garments!  Once you follow 2014Foundations, I can add you to "Who can pin?" for each board.  I will only be adding people who have signed up here or joined the group on Facebook, so if your Pinterest name is different from your Blogger or Facebook name, let me know.  Also, I'd be happy to hear your suggestions for any boards you think I should add.  Happy pinning!

Wednesday, January 8, 2014

Year of Foundations on Facebook

Just a quick post to say I've started a Facebook group for YOF participants to share inspiration, patterns, tutorials, and photos all in one place.  Anyone can join and invite their friends!  There will be photo albums for each category, so once you've finished an item you can show it off - and get inspiration from each others' work.

Wednesday, January 1, 2014

Year of Foundations - My Goals

My primary goal for the 2014 Year of Foundations challenge is to build a full set of 18th Century undergarments.  I already have a suitable shift and two pairs of beautiful silk stockings from American Duchess, but I have no usable stays or skirt supports.


My one shift is cotton, and I plan to make a more historically accurate linen one (or two).  I also have one flounced petticoat, and I definitely need more.  So, here are my plans:

  • 1 or 2 linen shift(s)
  • stays
  • grand pannier
  • pocket hoops
  • bum pad
  • 2 or 3 petticoats
  • embroidered garters
I intend for this set of foundations to be multi-functional, which is why there are several different options for skirt supports on my list.  I will need the grand pannier for my planned 18th Century Court Gown (another challenge I am taking part in this year), but for more "everyday wear" in my costuming wardrobe I will want smaller skirt supports such as the pocket hoops or just a bum pad.  

This is my one petticoat.  It needs support.  
My secondary goal is Victorian foundations!  I have... nothing.  :p  I need:  
  • chemise
  • possibly drawers
  • corset
  • bustle
  • petticoats
I also need to pin down a time period of focus for my Victorian plans.  I know I want a bustle, so I need to research the Early Bustle and Late Bustle periods and decide which one best suits my purposes.  Right now I have very vague plans for a gown based on the fabric that I have in my stash at the moment.  

Vague Victorian skirt ideas
So that's what I have planned for 2014!  I'll be starting with stays, so that will be my next post.  Stay tuned!  And if you're interested in participating in the Year of Foundations, just leave me a comment on my intro post and I'll add you to the list.