Showing posts with label Accessories. Show all posts

Tuesday, June 5, 2018

1785 Swallowtail Jacket - Finally Finished!

At the beginning of May, with limited time before my next 18th Century outing, I decided to finally finish this jacket and add some new accessories to it instead of trying to make a whole new ensemble from scratch. 

When I first made it back in 2014, I ran out of time to add the ruffle at the neck before I wore it for the first time: 

Brian the Engineer took some very nice photos at the time.
Then I never got around to it after the fact.  And I wore it again last April, this time adding a stomacher to accommodate my baby bump: 


I was focused on making sure the ensemble fit, so I also made a very quick and dirty apron to cover the gaps at the sides of my petticoat.  So again, no time to add the ruffle.  But I had set aside a long strip of my block-printed fabric when I first cut out the jacket, because I wanted to recreate my inspiration piece as closely as possible: 

Woman's Linen Jacket, by Unknown Maker, 1785-90  Victoria & Albert Museum
I hemmed the ruffle by hand (though I'm not sure now why I didn't just pink it) and pleated it somewhat by eye to the neckline.  


I did not have time to attach it by hand, however.  I just turned down the top edge about 1/4" and basted it on by machine: 


I can always unpick the basting later and hand-tack it down.  But I am so much happier with the jacket now, and I really enjoyed accessorizing it!  

I had gotten this hat several years ago, and finally got around to decorating it properly: 


I started with sheer striped cotton leftover from my Sheer Striped Regency dress.  I had set aside a yard to make a kerchief for myself before dyeing what was left to make Reptar her own Regency dress someday.  That's not entirely relevant, but I like getting multiple uses out of my fabrics.  I cut a square from the un-dyed yard to use for the kerchief, and then I had a strip about a foot wide left over.  I cut this into several 4" wide strips:  


I marked out eight divisions on the brim, to give myself a guide for pleating.  I pinned the strips along the outer edge in approximately 1" box pleats, then smoothed the pleats in toward the crown as evenly as possible.  I was quite pleased with the results: 


Then I played around with some purple velvet ribbons and one leftover strip of cotton to decorate the crown: 


I managed to make a bow without cutting the ribbon!  I'll do a separate post about that, in case anyone is interested in how I did it.


I rather like the result. 


I had worn this kerchief before un-hemmed and just tucked into my neckline.  But is hemmed now: 

It needs to be pressed, clearly.
 I finished two sides of the triangle with a hand-rolled hem: 


The third side was the selvedge of the fabric, which I left alone because there was no shrinking or stretching when I washed it. 


I made a new apron - I wanted a nicer one than the one I wore last April. 


I also wanted to try the rolled whip gather technique: 


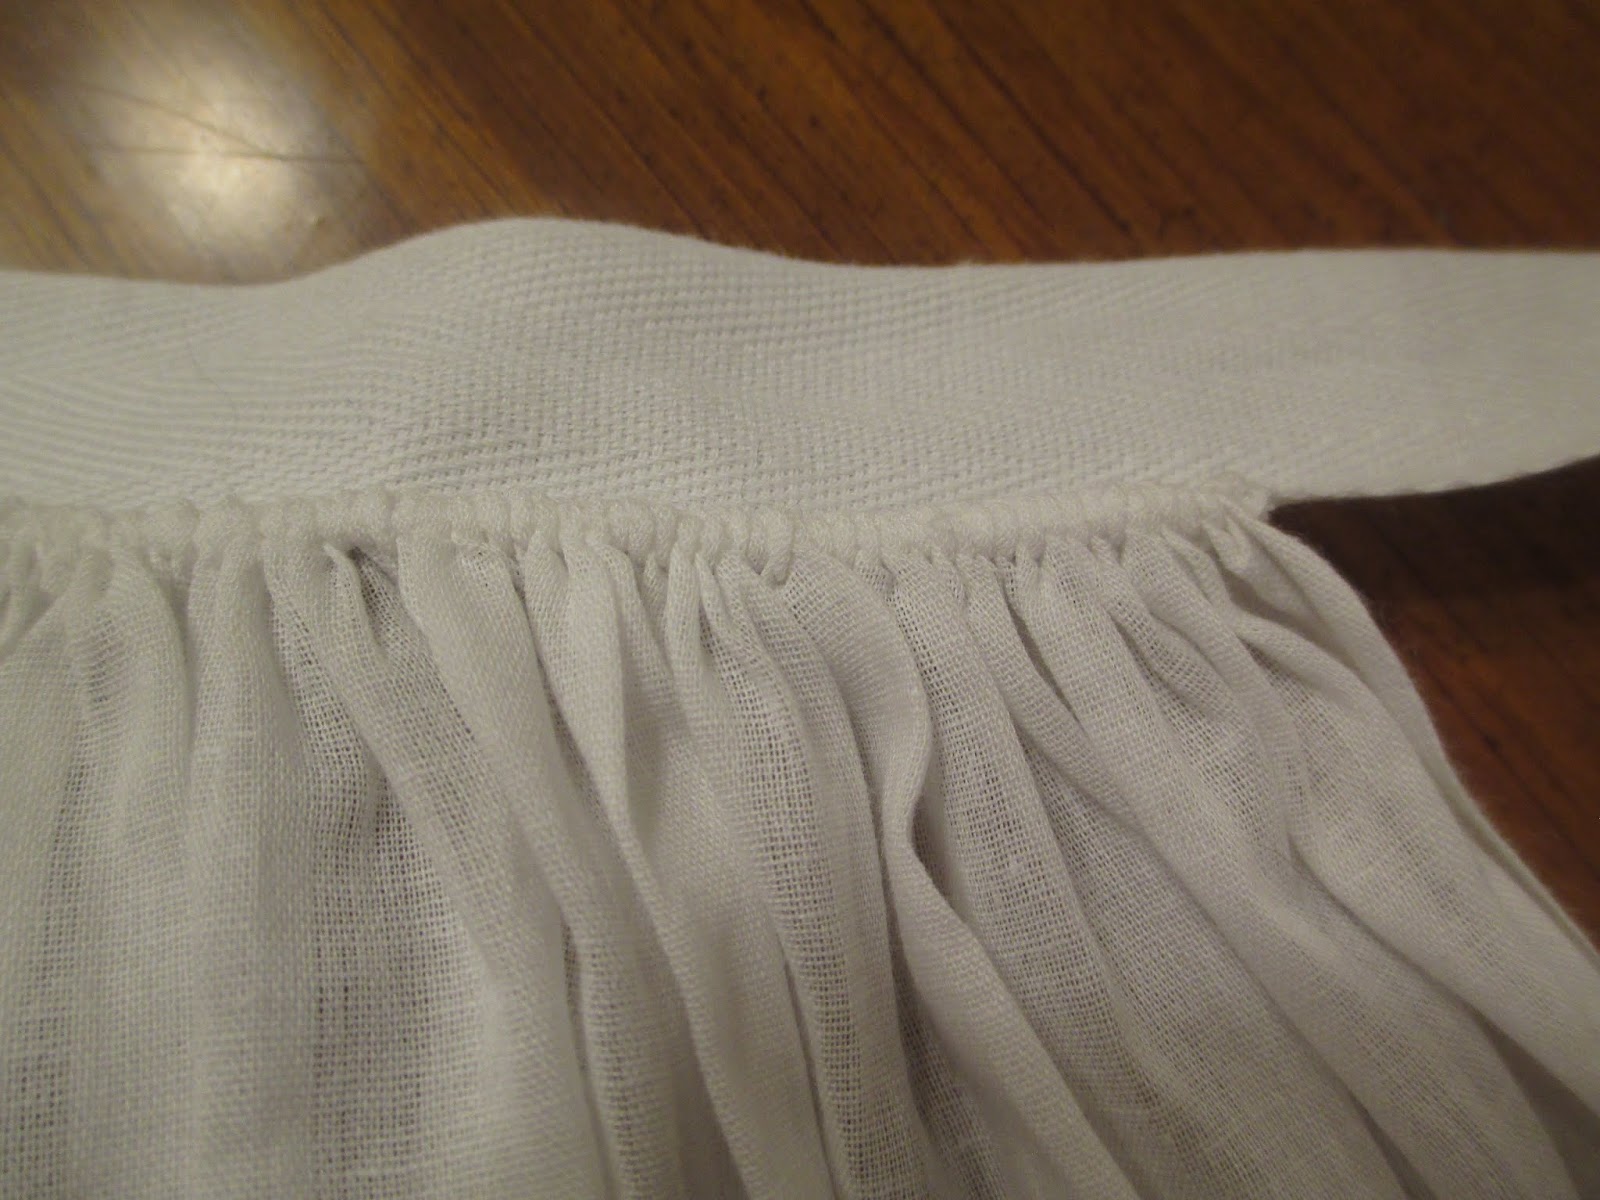
I used the same cotton voile as my kerchief, again leaving the selvedges alone and just hemming the lower edge: 


I also lightly starched the fabric before I made it. 

And finally, I needed a 1785 hairstyle! 

Something like this
I had never before attempted a "hedgehog" hairstyle, but how hard can it be?  I put my hair up in rag curls overnight, and started building the style by pinning large hair rats to the top of my head: 


I then let down the curls, and combed them out one at a time to give them fluff and volume: 


I didn't tease the hair, because I didn't want to make it too tangled, and I wanted to retain the curl as much as possible.  Then I basically just draped them over the rats: 


This part was fun.


At the sides, I tried to keep as much volume as possible, to fill in where there were no hair rats to build on: 


And I kept three or four curls hanging down at the nape of my neck: 


All in all, I was pretty happy with the look I accomplished:  


One really nice thing about the apron is that it hides the fact that the front of the jacket is just a bit too short and tends to show the waistband of my petticoat.  And without even trying, I had gathered the fabric to exactly the width of the space between the two sides of the peplum! 


I think the ruffle really adds a lot to the look!


These photos were all taken after I'd gotten home from the event (and had taken off my bum pads to make driving easier).  Next post will be all of the photos taken in Williamsburg!  

Saturday, February 18, 2017

My First Historical Sewing Workshop!

Last weekend I attended the Mitts, Muffs, & Hoods workshop in Savage, Maryland.  I carpooled up with Melissa and Elyse, who both work at Colonial Williamsburg (and I'm just now realizing I didn't get pictures with either of them!  Shoot).  I had a lovely time!  I got to make new friends and hang out with fellow historical costumers I hadn't seen in almost a year.  Plus I learned some new information about staying warm in the 18th Century, as well as new sewing techniques to make my winter accessories more historically accurate.

It was also fun to join others dressed in 18th Century clothing and hand-sewing using 18th Century methods!


My table-mates for the day - Taylor and Carolyn:


Carolyn was also the keynote speaker, and looked fantastic in her Italian gown!


She talked about the various garments women of three different economic and social classes wore to keep themselves warm in 18th Century winters.  She had many examples in portraits and fashion plates - as well as some extant garments in museums - in a Powerpoint presentation.


It was very informative and interesting.

Next, Vicki presented the Mitts portion of the workshop:


She had brought samples of three different sizes of a pattern for us to try on, as well as some finished mitts she had made.  I was especially taken with this embroidered linen pair:


After we each chose a size to make, and Vicki gave us guidelines for any alterations we might need to make, we got to work cutting.  Taylor and I opted to lay ours out on the floor, as table space was limited:


Vicki walked us through her detailed, step-by-step instructions with Powerpoint slides in addition to the printed directions in our handout packets.

Halfway through the Mitts portion of the day, we broke for lunch.  Did I mention they fed us really well all day long?  There were pastries, coffee, and tea for breakfast, a variety of sandwiches and veggies with fresh apples cider for lunch:


And dinner (which I did not take a picture of) was pasta and cooked veggies.  It was all very tasty, and there were desserts on top of all this!  Pregnant Chelsea likes to snack all day long, so this was pretty much heaven for me.  :p

After Mitts, we moved on to Hoods.  Ruth presented:


She had provided two patterns for each of us - a small, close-fitting hood and a larger, more fashionable version.  Both are meant to be a distinct garment, separate from a cloak (in fact, they can each be worn under a hooded cloak for an extra layer of warmth.)  She also provided a fitting muslin of the smaller hood for everyone:

We all try on our hoods.
She helped people with fitting, as the smaller of the two hoods is meant to be worn very close to the head, being a practical garment intended to keep the ears warm.

I chose to make the larger, fashionable hood.  I was enchanted with its over-the-top-ness.  Ruth had a sample she had made that we could try on:


The front edge can be folded back to show the contrasting lining around the face, and the drawstring at the neck can be drawn up for a closer fit.  I also loved the little cape/peplum option.

Finally, Sarah presented Muffs!


This was where we all got to have a lot of fun with trims and embellishments!  Check out this example:  

I think this one was Vicki's.
Sarah walked us through the construction of a basic muff base and a removable, embellished cover.  She talked about historically accurate options for filling the base, such as wool roving and down.  One thing I learned was that often the muff bases were just a flat "pillow" that you could roll up to slide inside a cover, which makes it more versatile if you have muff covers of different sizes.  Also, a flat pillow takes up less space in storage than a round base.  

I had brought my muff base (stuffed with very period-inaccurate poly-fil) and the first cover I had made for it, and I had originally intended to just make a new cover for it.  But now I want to make the flat pillow style, stuffed with wool roving!  A couple of the participants had brought wool that they were either selling or giving away, so I got enough to make myself a new muff base.

I will blog about all of my projects from the weekend separately, as soon as they're finished!  That's right, I didn't complete a single project all day.  I was very productive, though!  They are all in various stages of completion.  

Here are some aerial shots of the participants hard at work:  


This building - Carroll Baldwin Hall - was built in the 1920s as the Town Hall (I believe), and has a very lovely Colonial-revival style.  I loved the big windows that let in so much natural light!


Here is the whole group outside the hall:


Oh, and here is the maternity outfit I ended up throwing together (Taylor was kind enough to take some photos for me):


As you can see, my petticoat gaped a bit at the pocket slits - which made getting into my pocket a bit easier, actually!  If I had had time, I would have made an apron to cover the front and sides so you wouldn't notice, but oh well.  As it was, I barely had time to throw together a stomacher for my Green Jacket.  I ended up just making the shell of one, slipping my newly-made block-printed stomacher inside, and stitching the top closed!  :p  But it worked.  And I've already blogged about my maternity stays and how comfortable they are.  I seriously might start wearing them as a daily thing!