So I set out to find a pattern for a front-closing bodiced petticoat. I didn't find one. I searched Pinterest to see if such a thing even existed, and found this:
 |
| National Trust Collections |
It looks like it functions as the interior of a bib-front or apron-front gown. Should be easy enough to re-create.
I set about drafting a pattern.
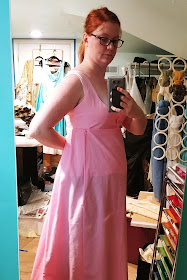
I wish I had taken pictures of the draping process, but I wasn't thinking ahead. Basically I put my first drawstring dress on my dress form, draped some muslin scraps over it, and drew the lines I wanted the bodice to have. I gave it a much smaller center back piece than the original:
 |
| My back is slightly twisted here because I'm holding the camera over my shoulder. |
After sewing together my mockup and trying it on for fit, I found that the armscye was gaping in the front on both sides. (You can't really see it in the pictures.) I consulted the reference image again, and saw that the shoulder strap was a separate piece that attached to the bodice at the front and back. So I marked where the seam should go, and wrote notes on my mockup:
I cut the muslin in two at this line, and took the whole thing apart and traced it onto tissue paper. I added a seam allowance at the neckline edge, tapered to nothing at the armscye to account for the gaping caused by excess fabric at this edge:
When I had all my pieces traced, I cut them from sturdy polished cotton.
I assembled the pieces and tried them on again.
 |
| This seam juncture is going to be tricky... |
I was happy with the fit, so I went ahead and cut them again from my Pepto-pink cotton. I assembled those pieces, but kept them apart at the side back seams. I also unpicked the same seams on the white bodice, and put the two layers together right sides together. Then I stitched around the neck edge and armscyes:
 |
| Looks super weird like this, I know. |
Turning them inside and pressing:
And inserting the side seam allowances in between the inner and outer layers:
I pinned these seams through all layers:
Then I prick-stitched through all layers by hand:
Stopping about an inch and a half from the lower edge, and stitching the white and pink layers separately from there to the bottom:
I cut the remainder of my fabric - about 2 2/3 yards - into two panels for the skirt. The selvedge hadn't shrunk at all from washing, so I knew I could leave it as-is and not worry about finishing the long skirt seams. However, I did cut one of the panels in two for the center front of the skirt. So I did have to finish that one seam allowance. I thought about just cutting a slit down from the top where I wanted the opening to be, but I like this way is easier to finish by machine.
I pleated the skirt back:
There was a LOT of width to take in at the top, so I stacked the pleats:
I actually followed the pleating diagram for one of the Regency dresses in the book An Agreeable Tyrant, and I love how it turned out! I'll definitely use this pleating method again on a future gown.
I basted the pleats down with two rows of stitching, to keep them secure while attaching the skirt to the bodice:
There was a time when I would have skipped this "unnecessary" step, but I've learned that it gives me a much lower chance of having to redo parts of the seam. And it's way fewer pins to potentially sew over:
As you can see, I attached the skirt to just the outer fabric of the bodice.
After I'd attached the skirt back and sides, I hemmed the 14"-long slits in the skirt where the skirt front is attached. The front panel itself is 22" wide at the hem, tapered to 18" wide at the top above the slit. I tried on the petticoat at this point to check how the skirt was hanging.
The side front needed to come up a bit, which is unsurprising. The skirt was cut and assembled as a straight tube, and the bodice was draped to fit my body. So some small adjustments would naturally need to be made.
I folded up the top edge and pinned it in place to mark where it needed to sit. I unpicked the seam for a few inches, and re-stitched it:
Now I could finish the bodice! I stitched the center front and bottom edge up to where the skirt starts by machine:
After I turned these front tabs right side out, I turned up the rest of the lower edge of the lining and whipped it to the skirt seam allowance by hand.
I also adjusted the front skirt panel so that it would hang level with the rest of the skirt:
I turned the top edge down and pinned it where it looked right.
Bonus shot of the finished back:
I don't have good photos of this, but the top front edge is curved slightly so that it dips down in the center. I turned in the raw edge and stitched it down by machine, tucking 1/4"-wide twill tape ties in at the same time. Here's the finished petticoat on my dress form - it's wrinkled because it's been worn once and washed, but not ironed:
I put two 1" tucks in the skirt, about four inches from the bottom.
It's super comfortable to wear because of the large armscyes, and I love how full the skirt is at the back.
I didn't add any kind of fasteners to the front bodice. I just pinned it closed when I wore it, and that's probably all I'll ever do.
I just love how tiny the bodice back looks.
And it's so easy to get into and out of!
Overall, I'm very happy with the pattern, and I'm planning to make more! In fact, I have a blue one in the works already.
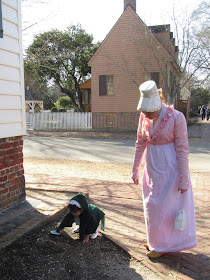
I don't have any photos of me in just the finished petticoat, but here are a couple where I'm wearing it under my Sheer Striped Gown:
It's not supposed to be longer than my gown skirt, so I need to correct this. But I like the way the pink softly shines through the sheer fabric. Especially when the sun hits it:


This turned out beautifully, and I love the way it works with the sheer dress.
ReplyDeleteThank you! I'm so happy when I can realize a design I've been dreaming about. :)
DeleteReally lovely. I'm making Regency ballgowns for my granddaughters and will be referring to this blog as I work on their bodiced petticoats.
ReplyDelete