It was a remnant of stage curtain fabric left over from the curtain that used to grace the screen of the movie theatre in my hometown. Those of you who know me well know that the theatre was my second home while I was growing up, because at the time my parents owned and ran it. (For those who don't know me that well, the theatre is a story for another day.)
I found the remnant rolled on a cardboard tube hidden way in the back of my old bedroom closet when I helped my parents move to their new house a few years ago, and I absconded with it. I had vague notions of making something historical from it at the time, since it does a pretty good job of imitating watered silk. To me, watered silk says 18th Century (or earlier).
My main inspiration was this cape and matching muff:
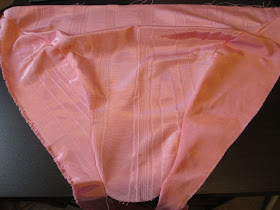
I used the remnant to measure the width that I needed, and ripped the sheet down to that size. My pink fabric was not quite square, having one corner shorter than the rest as you can see below:
 |
| It's folded in half here. |
I wanted to make the mantle all in one piece with no seams (save for the hood), and I figured that this would be the best way to achieve that aim. The slit allowed for a very nice drape around the shoulders:
I tried the mock-up on myself to get a feel for how my arms would interact with it while wearing. Many of the reference images I was using showed such capes being cut shorter at the elbow than at the front edges, and I wanted mine to be longer again in the back.
I marked the elbow with a fabric marker:
(The fabric marker was very hard to see in the following images, so I accentuated the marks using MS Paint.)
I also marked the front edge where I had folded the fabric over to create the line I wanted:
Then it was a simple matter to connect these marks in a smooth, curving line:
 |
| The original fabric marker line is much smoother than my MS Paint skills would suggest. |
I contemplated two different lengths for the side back portion:
I ultimately went with the shorter length, as it matched up better with the front:
And tried on the final shape once again:
 |
| It's always awkward taking pictures of my own back, but it's the best I can manage when my husband is at work. |
But since the center of the pink was quite a bit longer than the sheet mock-up, I decided to extend the center back bit for some visual interest. I drew another curved line down from the corner on one side:
 |
| Once again, the fabric marker line has been enhanced with MS Paint. |
Then I went shopping for the rest of my materials. I decided to line the mantle with white cotton flannel, and edge it with marabou feather boas. I (mistakenly) thought that this would be easier to work with than faux fur. And I liked the look of the feathers better.
 |
| Such pretty materials |
So I marked approximately where the little tail at the center back extended past the edge:
And added a piece on:
Then I used the pink fashion fabric piece as my pattern for the lining:
I cut the lining with right sides together so that I could immediately sew the two together without unpinning anything:
I left an opening at the neck edge, and understitched the lining to the seam allowance. Then I pressed the edge and tried it on for quick pictures, now that Brian the Engineer was home from work:
It's quite cozy, and I like the shape of the back better than the straight-across edge of the mock-up. I know I saw a shape like this somewhere when I was researching the project - I think it was a lace mantle - but of course now I cannot find that image. Oh well.
Next I tackled the hood. It was a little tricky, since I had only a few oddly-shaped scraps to work with, and one of the pieces had a couple of ugly stains on it:
 |
| This is all one piece, just folded in the middle to fit in the frame. |
Unfortunately, I did need to rinse the Oxyclean solution out with water, which necessitated getting the entire piece wet finally. I blotted most of the water out with a towel, then ironed it until dry. And I was right that this lost me the watered-silk finish:
But at least the stain was gone! And I was hopeful that once I constructed the hood, the lack of finish on this relatively small piece would not be too noticeable.
The biggest scrap I had was the section that was cut out to create the neckline and front edges. This became the main body of the hood, but it was too narrow down the middle and especially at the rounded end. So I attached the curved pieces that were cut to create the sides over the arms:
 |
| The right-hand piece is the one that had the stains. |
 |
| After |
 |
| Before |
 |
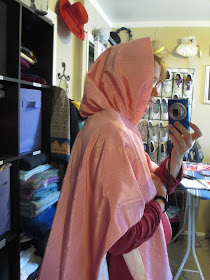
| Yay, more mirror selfies! |

I was moderately pleased with the look, so I pinned it to the neckline and tried the whole thing on:
It turns out it is even more difficult to get a picture of the back of my own head when my peripheral vision is cut off:
 |
| This is the best take out of four. :p |
Then I cut off the excess flannel and stitched them together along the straight edge:
 |
| I also understitched the lining in the same way as the cape body. |
Brian the Engineer was kind enough to take these photos for me in the backyard, even though it was almost chilly enough to need the cozy, comfy mantle:


I have - since these photos were taken - managed to piece together a matching muff cover from the remainder of the scraps, but I will need to buy another feather boa to trim it before it's done. In the meantime, I used my first ever muff cover for this quick photo shoot, since it matches my gown so well:

I am happy to report that the once-stained piece of the hood is not noticeable at all when I'm wearing it, even though it no longer has the pretty watered finish as the rest of the mantle.
If it's not clear from the photos, I love my mantle! It's so girly and fluffy that it appears extremely frivolous and ornamental, but it's actually a very warm and practical garment. I won't have much need of it in the coming summer months, but perhaps this winter I'll have some fancy 18th Century event where I can wear it.
The Challenge: Protection
Material: Questionable content faux watered silk, cotton flannel, marabou feather boas
Pattern: Made up my own
Year: Late 18th Century
Notions: White thread
How historically accurate is it? The overall shape seems to be reasonably accurate, though my hood construction is rather inventive. Since I don't know the fiber content of my main fabric, I'm going to give it a 60% rating.
Hours to complete: For the basic construction, probably 2.5 to 3 hours, then another 4 or 5 for attaching the feather trim.
First worn: Only for photos so far, April 3.
Total cost: Faux watered silk: free! 2 yards cotton flannel: $4.78 (with 60% off coupon at JoAnn's) 3 marabou feather boas: $16.47 Total: $21.25


I am not the world's biggest fan of pink, silk moire, or maribou trim, but DANG if this doesn't look great! I watched the post unfold with a vague, yet building sense of dread ("wow, that's pink... no way is she going to... oh, dear lord, please not the maribou!"), but it came together so beautifully. I love the color next to your gown, especially. They compliment each other well.
ReplyDeleteKoshka-the-Cat replicated this hood a few years ago out of satin, I think. I like the body/drape of yours a bit better.
You know, the funny thing is that I feel the same way! I like pink, though this particular shade of Petpo-Bismol is not my favorite, and I'm not crazy about silk moire (thank you for reminding me of the word) and maribou feathers. In fact, if I didn't have such a strong emotional connection to this fabric, I would probably hate it. :p I think the cape works because I just embraced the over-the-topness of it all.
DeleteThis is ADORABLE! I love the drape of your mantle, and that you made something so fluffy-looking a really practical garment. Lovely!
ReplyDeleteThank you! I wish it was cold so I could wear it more!
Delete