 |
| The Met |
 |
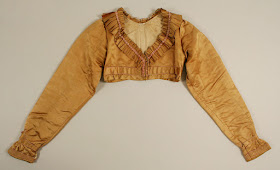
| Seen here with ribbon and some white silk/cotton that I planned to use for a coordinating hat |
I used the Laughing Moon #129 pattern, with no real alterations to the main construction. I didn't have time to make the ruffle for the first wearing, so I wore it without. I got very few pictures of me wearing it that day, and none whatsoever of the construction! I was on a time crunch, as usual. But I also followed the pattern instructions, so there was no real need to photograph what I did.
Here I am wearing it at the Hamilton-Burr Duel, on November 3 last year:
I was much too busy taking photos of Reptar that day! Plus I didn't yet consider it finished, without the ruffle. I added that later, for a mother-daughter photo shoot in Williamsburg in February.
I did take a few photos of the ruffle, because I deviated from the instructions significantly. The ruffle in the pattern is meant to be folded in half lengthwise and sandwiched in between the lining and outer fabric along the neckline. This creates a stand-up ruffle with the fold at the top, and the right side of the fabric covering both sides. But I wanted a flat ruffle stitched on top of the neckline, like my inspiration piece. So I hemmed the long sides, which turned out to be tricky. I tried hemming it by hand with a narrow rolled hem, but the fabric frayed badly and it was hard to keep a straight line as I was sewing. I ended up taking it out, and after some experimentation found a solution that would keep it from getting too bulky.
It's a little unconventional, but I used nylon seam tape that I had in my stash. I machine-stitched it to the right side, folded it to the inside and pressed to give it a good crease. Then I top-stitched 1/4" from the edge by hand, to simulate a hand-stitched hem.
I ran out of the seam tape that perfectly matched my fabric, so I had to use about eight inches of a paler pink. Luckily it's unlikely anyone will ever see it.
I knife-pleated my ruffle all around the neckline:
I stopped it at the spot where the fronts overlap, because I didn't have much length to work with. My knife pleats are very tiny as it is. I stitched them down by hand, about 1/2" in from the edge. And finally it was "done"! I still have more trim I want to add to it, but I'm much happier with the ruffle on it.
Here are some photos from the photo shoot:
I have since pressed the pleats on the ruffle so they sit a bit more flat. They were a little unruly that day. I will do another proper photo shoot when I've finished all of the trim I want to add.


No comments:
Post a Comment